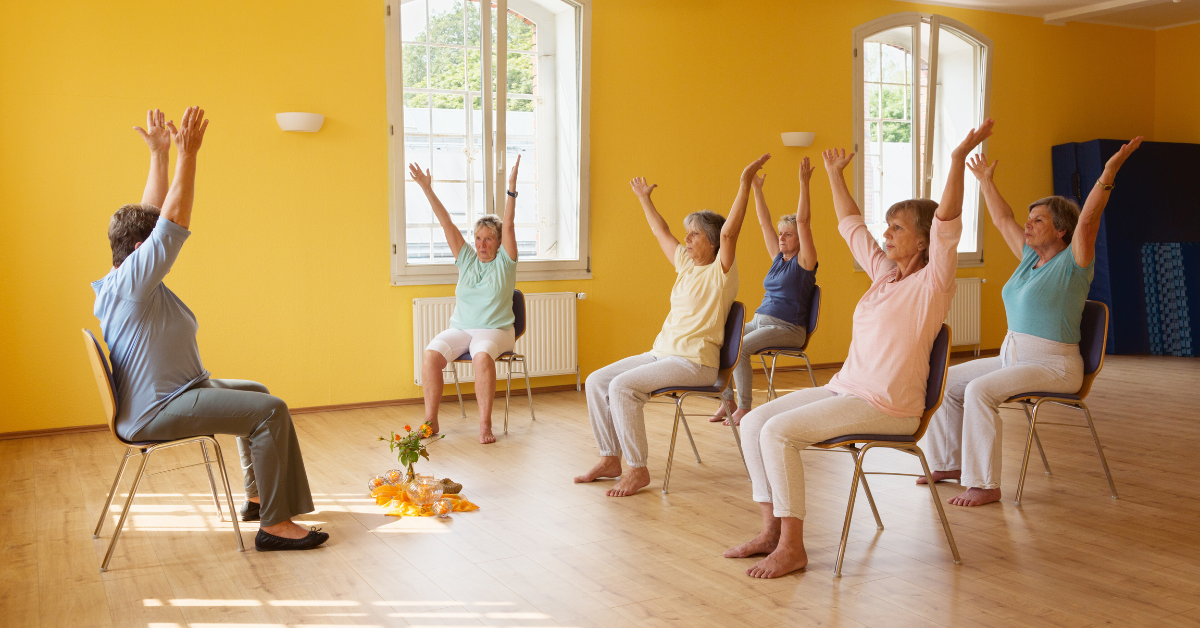
Heard about chair yoga and want to know more? Achy knees or trouble touching your toes won't stop you. You don't need to be flexible to enjoy yoga. Looking for the best chair yoga for seniors? You're in the right place. This gentle practice helps you stretch, build strength, and relax—all while sitting. Just grab a sturdy chair and get ready to move comfortably.
Chair yoga helps older adults stay active, improve flexibility, and reduce stress without worrying about balance or getting on the floor. Here’s how to pick a good program and some easy exercises to try today.
What to Look for in the Best Chair Yoga Program
Not all chair yoga programs are the same. A good one stands out for specific reasons.
Qualified Instructors Who Understand Senior Needs
Look for instructors trained to teach seniors or those with limited mobility. Look for certifications like:
- Registered Yoga Teacher (RYT) with senior yoga specialization
- Experience teaching older adults or adaptive yoga
- Training in modifications for common conditions like arthritis or osteoporosis
A good instructor explains why movements matter, gives options, and ensures you feel comfortable, even if a pose isn’t possible.
Clear, Easy-to-Follow Instructions
The best programs explain each pose simply. You shouldn’t need to look up yoga terms. Instructions must be:
- Spoken clearly and at a comfortable pace
- Accompanied by visual demonstrations
- Repeated enough times that you can follow along without frustration
If you are confused about arm or leg placement in a video, the instructions are unclear. Choose a program that matches your learning style.
Appropriate Pace and Duration
Start with 15 to 20 minute sessions. As you build strength, try classes up to 45 minutes. The pace should be slow for comfort but engaging. In relaxation sessions, it’s fine to feel sleepy.
Variety of Poses and Sequences
A well-rounded program includes:
- Gentle warm-ups to prepare your body
- Seated stretches for flexibility.
- Strength-building poses
- Balance exercises (using the chair for support)
- Breathing techniques
- Relaxation or meditation at the end
Repeating the same poses can get boring. Mix up your practice to stay interested and work different muscles.
Red Flags to Avoid
Not every program is worth your time. Watch out for:
- Instructors who push you to do poses that cause pain
- Programs that promise miracle cures or dramatic weight loss
- Classes with no modifications offered
- Overly complex sequences that leave you confused
- Avoid programs that use pressure or require expensive upfront payments.
Trust your judgment. If something feels wrong, skip it.
Beginner-Friendly Chair Yoga Exercises to Try Today
These beginner-friendly exercises are a great way to start exploring chair yoga at home. Many seniors find that following a structured resource, like a chair yoga book for seniors, makes it easier to practice safely and confidently. For more tips and routines, check out our guide to the best chair yoga for seniors, which highlights exercises designed to improve flexibility, strength, and comfort while staying gentle on the joints.
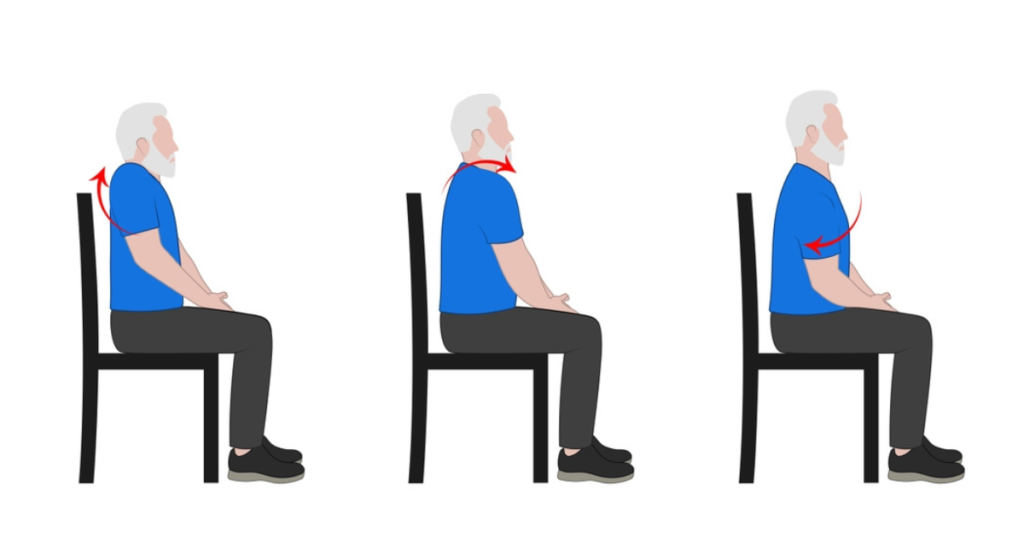
Exercise 1: Seated Cat-Cow Stretch (Warm-Up for Spine)
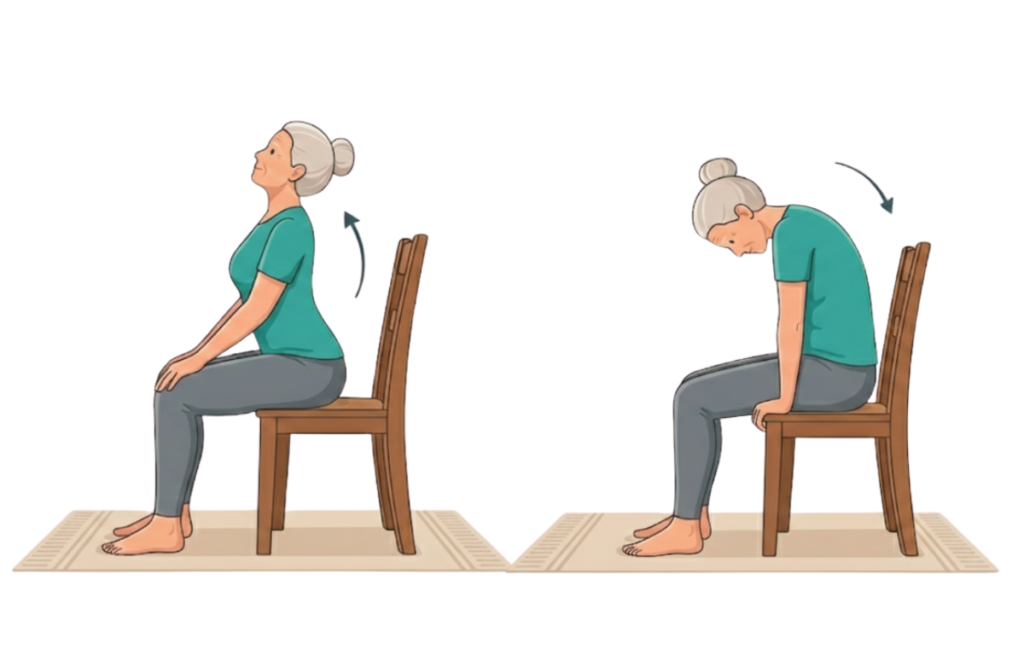
This gentle movement wakes up your spine, especially in the morning.
Step 1: Sit near the front edge of your chair. Make sure your feet are flat on the floor and about hip-width apart for stability.
Step 2: Place your hands on your knees or thighs.
Step 3: Inhale deeply and arch your back, lifting your chest and looking slightly upward (this is “cow”). Let your belly move forward gently.
Step 4: Exhale and round your spine, tucking your chin toward your chest and pulling your belly button toward your spine (this is “cat”).
Step 5: Repeat 5-8 times, moving slowly with your breath.
Benefits: Improves spine flexibility, reduces back stiffness, and helps with posture.
Exercise 2: Seated Shoulder Rolls (Tension Relief)
This exercise is great for relieving common shoulder tension.
1: Sit upright with your back straight and both feet firmly on the floor.
2: Allow your arms to relax and hang naturally down at your sides.
3: Inhale and lift your shoulders up toward your ears.
4: Exhale and roll your shoulders back and down, squeezing your shoulder blades together slightly.
5: Continue this circular motion 5 times backward.
6: Reverse direction and roll your shoulders forward 5 times.
Benefits: Releases shoulder tension, improves circulation, and reduces neck pain.
Exercise 3: Seated Twist (Digestive Health and Spine Mobility)
This exercise gently massages your internal organs.
1: Sit sideways on your chair so that the chair back is to your right. Keep both feet flat on the floor for balance.
2: Hold the back of the chair with both hands.
3: Inhale and sit up tall, lengthening your spine.
4: Exhale and gently twist your torso to the right, using the chair back for support (don’t force it).
5: Hold for 3-5 breaths, feeling the gentle stretch along your spine.
6: Release and repeat on the other side by turning to sit with the chair back on your left.
Benefits: Improves spinal rotation, aids digestion, and stretches the back muscles.
Exercise 4: Ankle Circles (Circulation Booster)
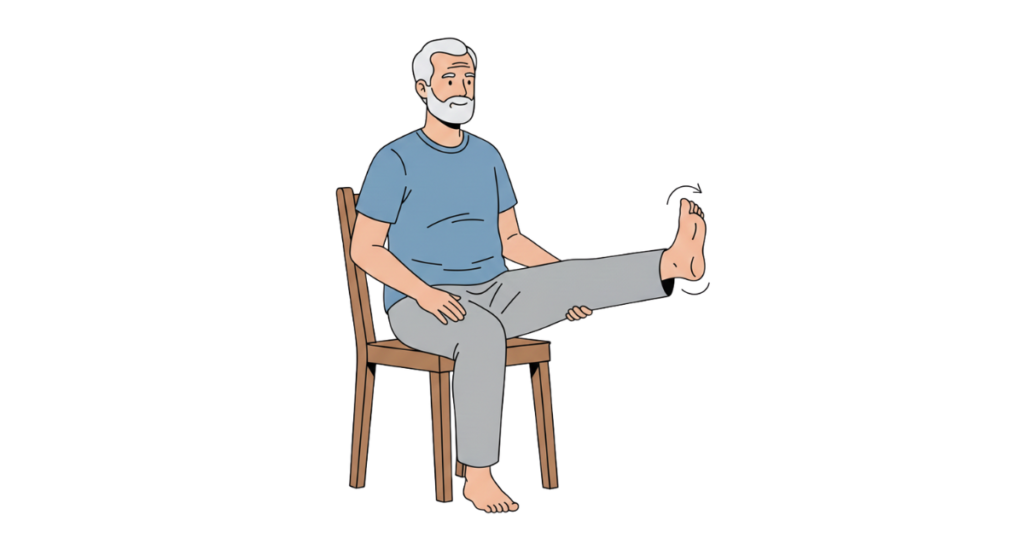
This exercise helps if your ankles swell or you sit often.
1: Sit comfortably toward the back of the chair, ensuring your back is fully supported.
2: Slowly lift your right foot off the floor, keeping your leg relaxed.
3: Slowly rotate your ankle in a circular motion, making the largest circle you can comfortably make.
4: Do 5 circles in one direction, then 5 circles in the opposite direction.
5: Lower your right foot and repeat with your left foot.
Benefits: Improves ankle mobility, increases circulation in the lower legs, and reduces swelling.
Exercise 5: Seated Forward Fold (Gentle Hamstring Stretch)
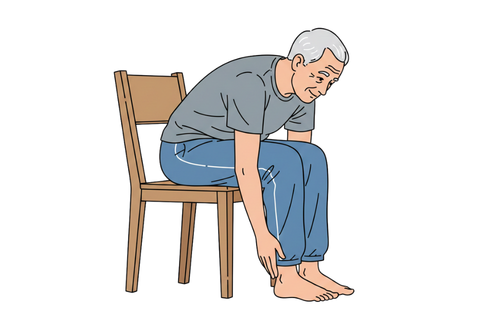
You can achieve an effective stretch while seated with this exercise.
1: Move forward in your chair. Place both feet flat on the floor, hip-width apart for comfort.
2: Inhale and sit up tall, lengthening your spine.
3: As you exhale, slowly lean forward from your hips, not your waist, and let your hands gently slide down your thighs.
4: Only go as far as feels comfortable. You might reach your knees, shins, or just halfway down your thighs (all perfectly fine).
5: Let your head and neck relax. Take 3-5 deep breaths.
6: Slowly roll back up, one vertebra at a time.
Benefits: Stretches hamstrings and lower back, calms the nervous system.
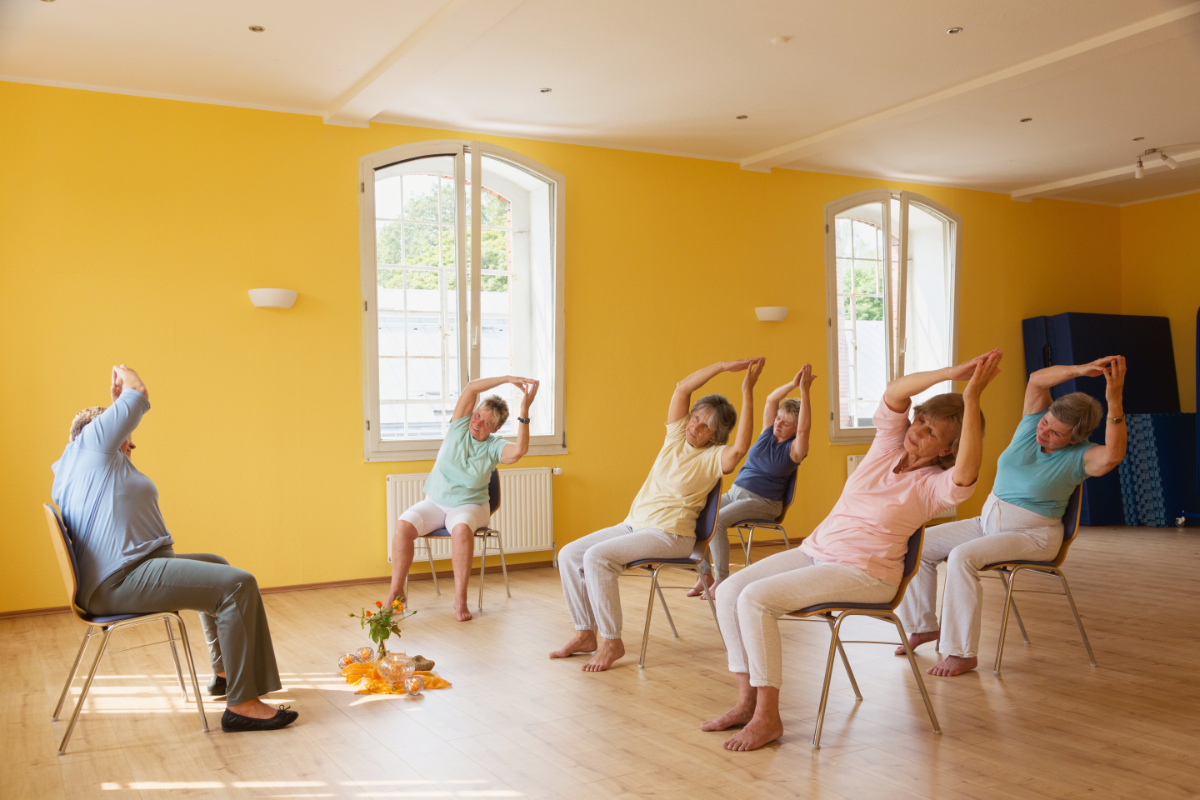
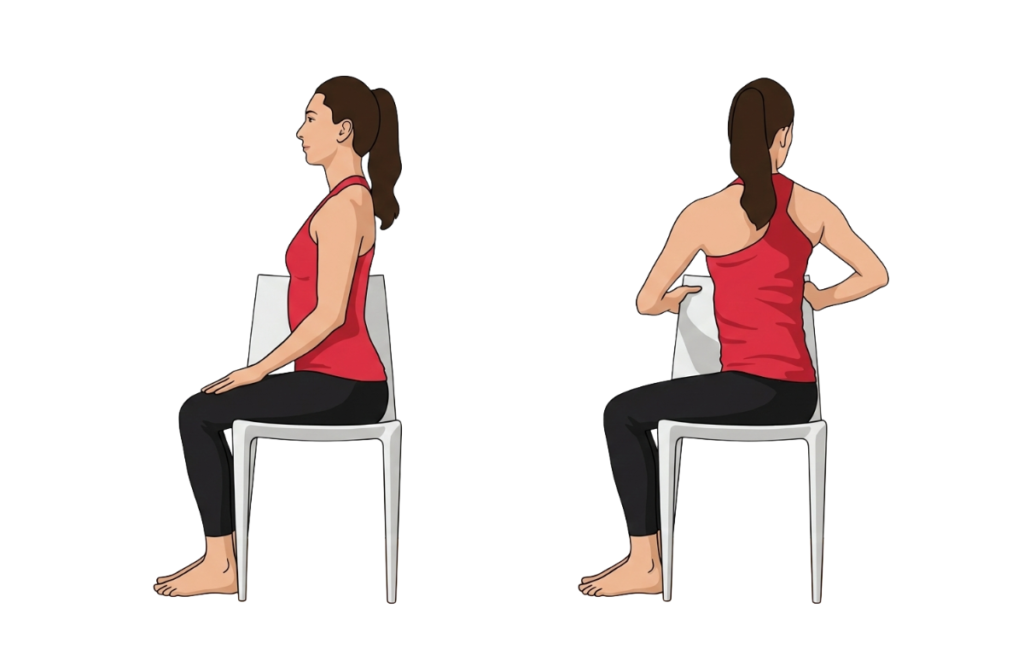
Exercise 6: Seated Side Stretch (Opens Up the Ribcage)
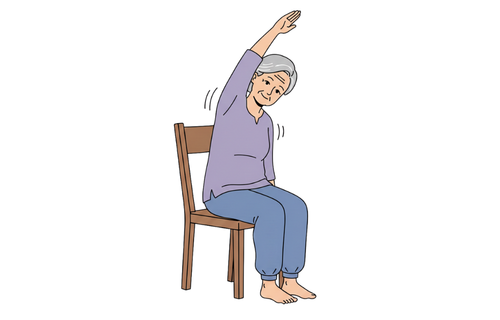
This stretch helps if you slouch often.
1: Sit tall with your back straight and feet placed flat on the floor.
2: Lift your right arm straight up toward the ceiling, keeping your left arm resting at your side.
3: Take a deep breath in, reaching taller through your right fingertips to stretch the side of your body.
4: As you exhale, bend gently to your left. Reach your right arm over your head, aiming to stretch the right side of your body without lifting your hips.
5: Keep both sitting bones planted on the chair. You should feel a nice stretch along your right side.
6: Hold for 3-5 breaths, then return to center.
7: Repeat on the other side with your left arm raised.
Benefits: Stretches the sides of your body, improves breathing capacity, and releases tension.
Step-by-Step Guide to Choosing Your Perfect Chair Yoga Program
Ready to find the right program? Here are tips to help you choose without overwhelm.
Step 1: Assess Your Current Fitness Level and Goals
Be honest. Can you sit and stand from a chair easily? Do you have injuries or conditions your doctor noted? Write down:
- What you hope to gain (better flexibility, less pain, stress relief, stronger muscles)
- Any physical limitations or concerns
- How much time can you realistically commit each week?
This process is not about judgment. Find what works for you now.
Step 2: Decide Between Online and In-Person Classes
In-person classes offer:
- Direct feedback from instructors
- Social connection with other participants
- Set a schedule that creates accountability.
- No technology headaches
Online classes provide:
- Practice anytime that suits your schedule
- Comfort of your own home
- Often more affordable
- Ability to replay and practice at your own pace
Check local senior centers, yoga studios, and community centers for options. Online platforms like YouTube, senior fitness sites, and apps offer free and paid choices.
Step 3: Try Before You Commit
Most paid programs offer a free trial or sample class. Take advantage of this! Watch or attend at least one session to see if:
- The instructor’s voice and teaching style resonate with you.
- The pace feels comfortable.
- The environment (whether online or in-person) works for you.
- You feel encouraged, not intimidated.
If a program doesn’t fit, move on and keep looking.
Step 4: Start Slowly and Build Consistency
Practice 2–3 days a week. Monday, Wednesday, and Friday work well with rest days between. Pick a set time, like after breakfast or before TV, to make it a habit.
Try creating a simple routine using the exercises above:
- Start with shoulder rolls (2 minutes)
- Do cat-cow stretches (2 minutes)
- Add seated twists (3 minutes)
- Include ankle circles (2 minutes)
- Finish with a forward fold (2 minutes)
This routine takes only 11 minutes. Ten minutes, three times a week, works better than ambitious daily plans you don’t start.
Step 5: Listen to Your Body and Adjust
Some days you’ll feel great, and other days your body might not be up for it. Both are normal. If you feel pain, instead of just a gentle stretch, stop and adjust or skip that pose.
As you progress, you might want to:
- Increase session length
- Try more challenging variations.
- Add an extra day per week.
- Explore different styles or instructors.
Your practice should help you grow and change as you do.
Frequently Asked Questions
Do I need any special equipment for chair yoga?
Just a sturdy chair without wheels (kitchen or dining chairs work perfectly) and comfortable clothes. Some people like a yoga strap or resistance band for certain stretches, but these are optional for beginners.
How long will it take to see results from chair yoga?
Many people notice they feel more relaxed and less stiff after just one session. For bigger changes, like improved flexibility or strength, give it 4-6 weeks of consistent practice (2-3 times per week).
Can I do chair yoga if I have arthritis or joint pain?
Yes! Chair yoga is recommended for arthritis since gentle movement helps reduce stiffness and pain. Tell your instructor about your condition for helpful modifications. Begin with gentle exercises like shoulder rolls and ankle circles.
Final Thoughts
You don’t need to be an expert to find the best chair yoga for seniors. With a little research, some trial and error, and a willingness to move gently and regularly, you can get started. You don’t have to be flexible, strong, or experienced. Just bring yourself, an open mind, and a chair.
Try one of the exercises above this week. Notice how it feels and what you enjoy or might want to change. Do it again a few days later. Soon, you might find yourself sharing this helpful practice with friends as your body starts to feel better.
Your chair is ready for you, and your body will thank you for the effort. You might even enjoy it more than you expect.