When most people hear the words “strength training,” they picture a sweaty gym filled with giant humans lifting weights that look like small cars. It is intimidating, loud, and frankly, a bit much. But here is a little secret: you don’t need to bench-press a refrigerator to get stronger. In fact, you can build incredible resilience and muscle right from your favorite sturdy chair. Starting a strength training program for seniors is one of the best things you can do for your body, and we are going to do it in a way that feels more like a gentle “hello” to your muscles than an interrogation.
Whether you are looking to make grocery shopping easier or just want to feel steadier on your feet while chasing the grandkids (or the cat), this guide is for you. We are going to keep things simple, safe, and maybe even a little bit fun. Grab a glass of water, find a chair without wheels, and let’s get moving.
Why Chair Yoga is Secretly a Powerhouse
You might think yoga is just about stretching like a pretzel, but chair yoga is actually a stealthy way to build strength. When we talk about strength training for older adults, we are really talking about functional movement. We want your legs to feel like sturdy pillars and your core to feel like a solid oak tree.
Using a chair provides a safety net. It removes the “oh no, am I going to fall?” factor, allowing you to focus entirely on engaging your muscles. Plus, it is much harder to lose your balance when your seat is already planted.
The Benefits You’ll Actually Notice
- Better Balance: Stronger legs mean fewer “whoopsie” moments.
- Easier Daily Tasks: Opening jars and getting out of cars require less effort.
- Joint Support: Muscles act as shock absorbers for your joints.
- Mood Boost: Moving your body releases those “feel-good” chemicals that make the world look a little brighter.
Your 4-Week Strength Journey: The Strategy
We aren’t going to run a marathon on Day 1. That is a one-way ticket to Nap Town. Instead, we will follow a slow, steady progression.
- Week 1: The Introduction. We are just waking the muscles up and telling them, “Hey, we’re doing this now.”
- Week 2: Finding the Rhythm. We will focus on form and breathing without holding our breath, as if we’re underwater.
- Week 3: Adding a Little Oomph. We will hold poses a few seconds longer to build endurance.
- Week 4: The Routine. By now, your body will expect the movement, and you’ll start feeling that “I’ve got this” confidence.
The Essential Beginner Exercises
Before we dive into the weekly schedule, let’s learn the “Big Five.” These are the bread and butter of our senior-friendly strength routines.
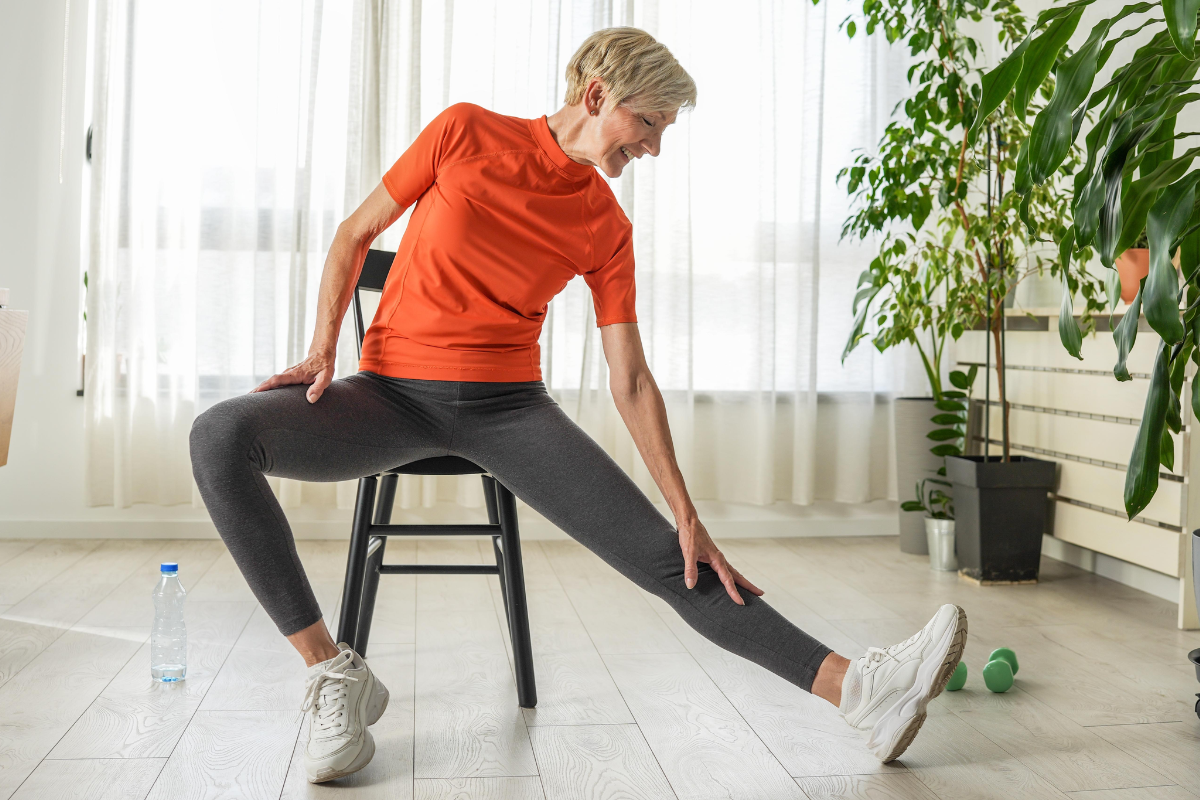
1. The Seated Mountain Pose
This might look like just sitting, but it is “active” sitting. No slouching allowed!
- How to do it: Sit at the front edge of your chair with your feet flat on the floor, hip-width apart.
- The Move: Imagine a string pulling the top of your head toward the ceiling. Roll your shoulders back and down. Place your hands on your thighs.
- The Strength Part: Engage your tummy muscles (pull your belly button slightly toward your spine) and press your feet firmly into the floor. Feel your legs engage. Hold for five deep breaths.
2. Chair Squats
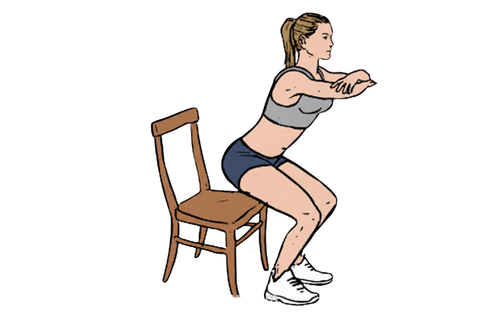
This is the ultimate leg builder. It simulates getting up from a couch, which is a vital life skill.
- How to do it: Start in your Seated Mountain Pose.
- The Move: Lean your chest forward slightly, press through your heels, and hover your bottom just an inch or two off the chair.
- The Goal: Hold that “hover” for three seconds, then slowly sit back down. If that feels too tough, just practice the motion of standing up and sitting down very slowly without using your hands.
3. Seated Leg Extensions
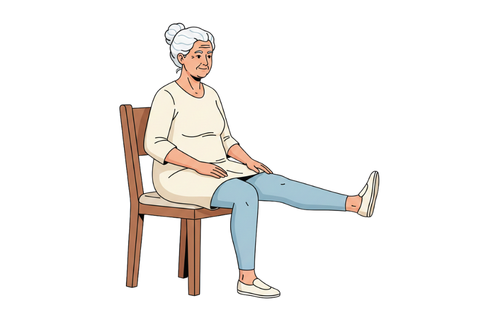
This targets the quadriceps, the big muscles on the front of your thighs.
- How to do it: Sit tall and hold the sides of the chair for support.
- The Move: Straighten your right leg out in front of you, flexing your toes toward your face.
- The Strength Part: Hold it straight for three seconds. Lower it slowly. Do ten reps, then switch to the left. It’s like you’re kicking away a pesky fly, but in slow motion.
4. Seated Warrior I
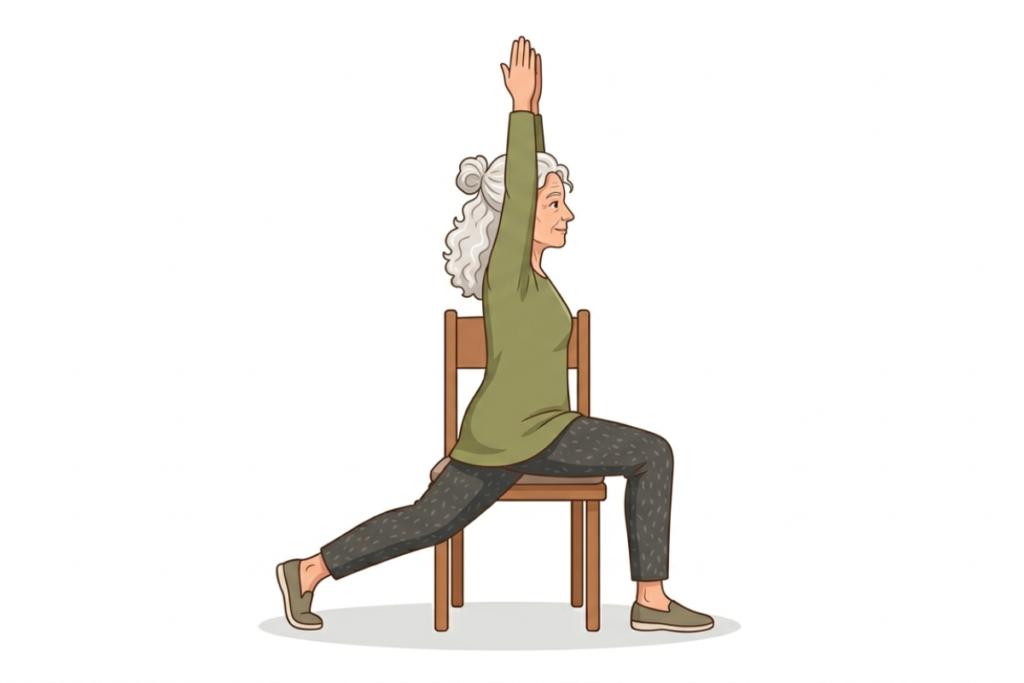
This helps improve hip flexibility and upper-body strength.
- How to do it: Turn your body so you are sitting sideways on the chair, with your right buttock on the seat and your left leg hanging off the side.
- The Move: Keep your right foot flat. Extend your left leg back as far as is comfortable.
- The Strength Part: Reach both arms toward the sky. Reach like you’re trying to grab a cookie from the top shelf. Hold for 30 seconds while breathing deeply.
5. The Seated Plank
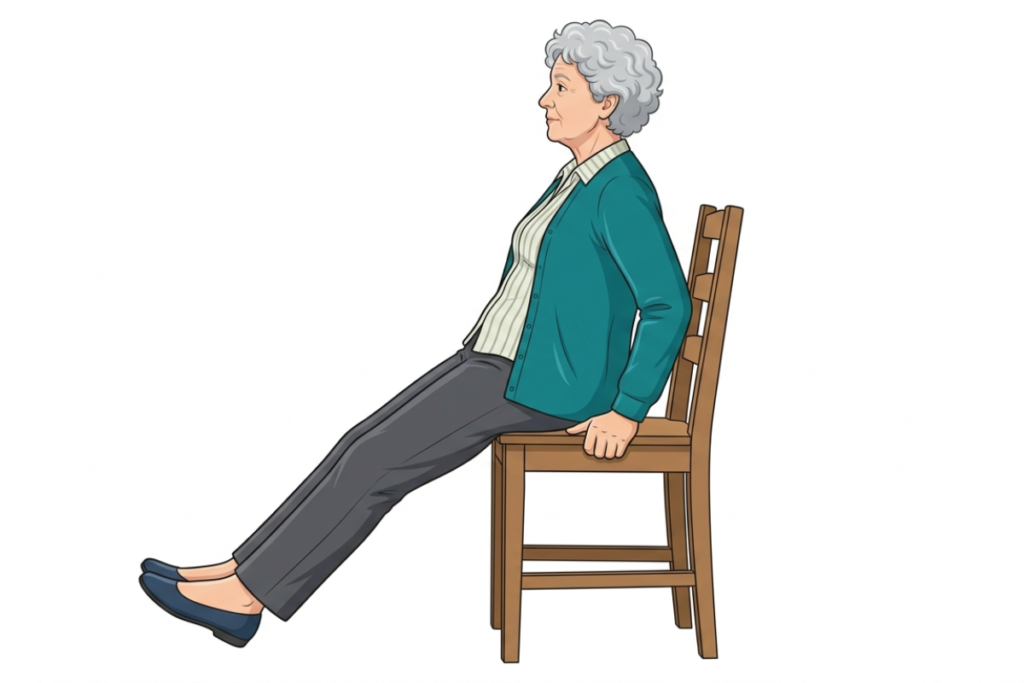
No need to get on the floor and struggle to get back up!
- How to do it: Sit on the edge of the chair. Grip the front corners of the seat.
- The Move: Lean back slightly (don’t touch the backrest!) and extend your legs out straight in front of you, heels touching the floor.
- The Strength Part: Keep your back straight and your tummy tight. Hold for 20 seconds. You might feel a little “quiver.” That is just your muscles saying, “Wow, we’re working!”
Week-by-Week Action Plan
Week 1: Getting Acquainted
Your goal this week is simply to show up. Do these exercises three times this week.
- Seated Mountain Pose: 5 breaths (3 rounds)
- Seated Leg Extensions: 5 reps per leg
- Seated Warrior I: 15 seconds per side
- The Golden Rule: If it hurts, stop. A little muscle “burn” is okay, but sharp pain is a “no-go.”
Week 2: Building the Habit
We are going to increase the repetitions slightly. Aim for three to four sessions.
- Chair Squats: 5 “hovers” (try to hold for 2 seconds each)
- Seated Leg Extensions: 10 reps per leg
- Seated Plank: 15 seconds
- The Golden Rule: Focus on your breath. Don’t hold it like you’re hiding from a jump-scare in a movie.
Week 3: Testing Your Limits (Gently!)
Now we add a little more time. Aim for four sessions.
- Chair Squats: 8 “hovers” (3 seconds each)
- Seated Warrior I: 30 seconds per side
- Seated Plank: 25 seconds
- The Golden Rule: Keep your posture tall. Imagine you are wearing a very expensive crown that you don’t want to drop.
Week 4: Finding Your Strength
This is the week when you might start noticing that the stairs don’t feel quite as steep. Aim for four to five sessions.
- Complete the full circuit of all 5 exercises twice through.
- Focus on moving as slowly as possible. The slower you move, the harder the muscles work!
Simple Tips for Success
Let’s keep it real: some days you’ll feel strong and energized, and other days, not so much. That’s completely normal, especially when you’re learning how to start strength training as a senior. Progress isn’t about feeling perfect every day. It’s about showing up in whatever way you can.
- Consistency Over Perfection: Doing five minutes of movement every other day is much better than doing an hour once a month and then needing a three-day nap.
- Hydrate Like a Pro: Your muscles need water to work properly. Plus, it gives you an excuse to get up and walk to the kitchen.
- The “Sturdy Chair” Check: Please, for the love of all things holy, do not use a chair with wheels or a folding chair that feels “dodgy.” Your safety is the priority.
- Listen to Your Body: It speaks a language called “sensations.” If it says “I’m tired,” take a break. If it says “I’m hurting,” take a longer break.
Final Thoughts
Starting a strength training program for seniors is not about turning back the clock; it is about making the most of the time you have right now. It is about feeling capable, steady, and vibrant.
Remember, you don’t have to be “good” at yoga. You just have to be present. Every time you choose to move, you are giving your future self a wonderful gift. You are proving that strength doesn’t have an expiration date.
Why not start right this second? Sit up a little taller in your chair. Take a big, deep breath in through your nose, and let it out with a sigh. There you go. You’ve already started! Pick one exercise from the list above and try it before you close this page. You’ve got this!
Leave a Reply